My Kodiak Cake Berry Syrup

I happened to be at Costco on a day when they were giving out samples of Kodiak Cake pancakes. Yum! I really enjoyed trying the Kodiak Cake berry syrups that they had. I even reached to put a bottle of syrup into my cart but after looking at the nutrition label and ingredients I reminded myself that putting that much liquid sugar on my pantry shelf was not going to help my self control any nor was it going to add any nutrition to my kids breakfast. I also realized that I could probably make a healthier version of the syrup anyway. So I put the bottle down and slowly walked away.

We usually don’t use syrup on our pancakes because they simply don’t need any. The moisture and flavor from the ingredients I use in my Protein Pancakes helps them stand alone. But a few weeks after I had tried the syrup at Costco I found an bag of frozen berries in my freezer that had been taken out to thaw and put back in the freezer all juicy. The berries had frozen together into a chunk of berries that I would have had to use an ice pick to separate. I saw this as an opportunity to try and make my own take on Kodiak Cake berry syrup. It turned out exactly how I wanted it and my kids loved it. The best part was that it was quick, easy, and only has 3 ingredients!

berry syrup

photo cred: mom 4 real

INGREDIENTS

  • About 2 cups of fresh or frozen berries (I used strawberries, blueberries, and a few raspberries)
  • 1/4 of honey (or less depending on how much tartness you like)
  • 1/2 t vanilla

I like to have a few chunks of berries in my syrup so I just put my frozen berry goop right into a saucepan with honey and vanilla and brought it to a boil. If you want yours smooth or with few chunks of fruit, try using a food processor or blender to cut up your fruit.

This syrup tasted great fresh and it kept well in the fridge for a few weeks. We even used it a few times for peanut butter and jelly sandwiches and as jam on bread.

Even if the amount of carbohydrates or sugars in my syrup was comparable to what you could find at the store, I get peace of mind knowing what ingredients were used, where they came from, and that there were no preservatives in my syrup. And my kids and husband loved it just the same!

*If you want to use raspberries or blackberries in your home made syrup recipe, avoid the seeds by blending your berries in a food processor and then sending them through a strainer before adding them to your sauce pan.*

Greek Yogurt Protein Pancakes


Whenever I’m looking to make a healthier version of typically nutrient lacking foods (aka everything baked goods) I turn to Jamie Eason’s recipes. She has some go-to’s that I use often. This is the first time I’ve tried her Pumped up Pancake recipe though and it did not disappoint! Something I really liked about this recipe was how these pancakes held their fluffiness and were more similar to the texture of regular pancakes compared to some other protein pancake recipes I’ve tried. This recipe makes a fair amount of pancakes so I always freeze the leftovers so my kids can pop them in the toaster on a morning we are pressed for time. I adjusted some of the ingredients on this list to fit what I had in my pantry so don’t be afraid to fiddle with it until they taste just how you like them!

pumped-up-protein-pancakes-2

photo from: thecakechica.com

INGREDIENTS

  • 3 cups oat flour (you can make your own oat flour by grinding whole oats in your vitamix or blentec)
  • 3 scoops protein powder. The recipe calls for vanilla protein but you could use any flavor you like, or try collagen protein powder for a pancake that isn’t so sweet.
  • 2 T honey or other sweetener
  • 3/4 t baking soda
  • 1/2 t salt
  • 6 oz plain Greek yogurt- we use the FAGE Greek yogurt because there is no added sugar and its packed with protein!
  • 1/4 cup unsweetened applesauce
  • 1 t vanilla extract (because I use 1 t of vanilla regardless of what I’m cooking)
  • 2 eggs or 4 egg whites ( I cant bear to throw away yolks for some reason so I use whole eggs)

Because of some of the thicker ingredients in this recipe you could blend all this up in your blender or you can mix it with a hand mixer. Another thing I love about protein pancakes, especially if you use vanilla protein powder, is that the pancakes stand alone. We don’t even buy syrup at my house because we simply don’t need it! If we want a little something extra on our pancakes our go-to toppings are:

Depending on the type of protein powder, Greek yogurt, and sweetener you use these pancakes will turn out a little differently. Don’t be afraid to fiddle with the recipe until you find the mix that tastes best to you! I hope you give these protein pancakes a try and enjoy this healthy twist on a favorite breakfast.

Zucchini Boats

How is it, that of all the plants in my garden, Zucchini is the most fool proof one?! We tried to go conservative this year and only planted two plants but have still been taken over by wheelbarrows full of zucchini. It’s wonderful, don’t get me wrong, but those suckers grow BIG and FAST! Most days when I remember to pick the zucchini it’s already the size of my forearm arm or larger. That’s a heck of a lot of zucchini noodles!

Gary likes to cut zucchini and squash into rounds and sauté them until they are caramelized or even a bit crispy. But this year my stomach just couldn’t do it every day. He had been such a champ and has eaten zucchini almost every meal this summer but I hit a breaking point and needed. A different option.

One day my cute neighbor reminded me about Zucchini boats! How could I have forgotten?! I was so stuck on what I couldn’t stand eating any more that I had a mind block and lost all cooking creativity whatsoever.

Typically with zucchini boats you use nice, cute, appropriately sized zucchini to make sweet, little personal boats of deliciousness. But let’s face it, I had monster zucchini I had to get rid of. So now I’m sharing my ah-ha moment with you.

We decided to use our giant zucchini to make two huge boats that we then sliced up to serve. And even though the zucchini was extra large it still tasted delicious!

I am pretty Plain Jane when it comes to things I like so I often times just re-use the same list of ingredients I’m different dishes. For my zucchini boats I used the same meat/cheese combo I often times use for stuffed mushrooms and quinoa meatballs. I also try and use what I have on hand that day to avoid a trip to the store if possible. Change the recipe to suit your preferences but you can use my ingredients as a guide:)

Zucchini Boat Ingredients

(Serves 2 very hungry people or 4 -6 people who are less of gluttons than we are 😉)

  • 1/2 lb of sausage
  • 1/2 lb ground beef or turkey
  • 1 egg
  • 1 8oz container of Parmesan cheese
  • 1 8oz package of mushrooms
  • 1-2 large zucchini or 4-6 normal size small zucchini
  • Salt/pepper/seasoning to taste

Directions

1. Preheat overnight to 375 degrees. Slice the zucchini length wise (hot-dog style ;)) and remove all seeds, leaving a large space for meat/cheese mixture. 
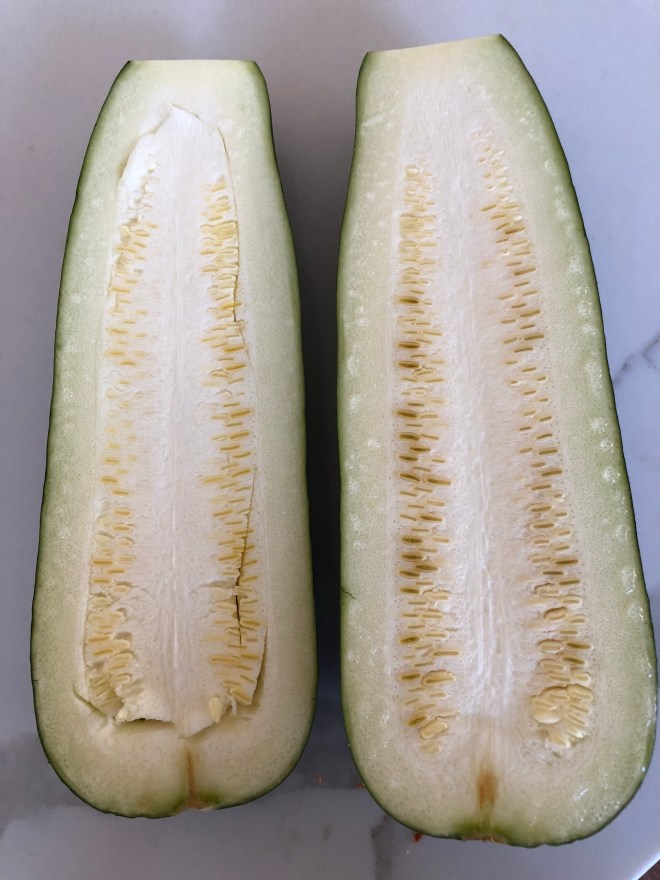
2. Slice mushrooms then combine them with sausage, ground beef, 1 egg, 3/4 of the Parmesan cheese, and seasoning until all ingredients are mixed together well (sometimes I just have to use my hands an mash it all together…I don’t have the patience to daintily mash it slowly with a fork)3. Fill the zucchini boats with the meat mixture until it is heaping. The meat will cook down …I personally like a healthy meat to veggie ratio. 
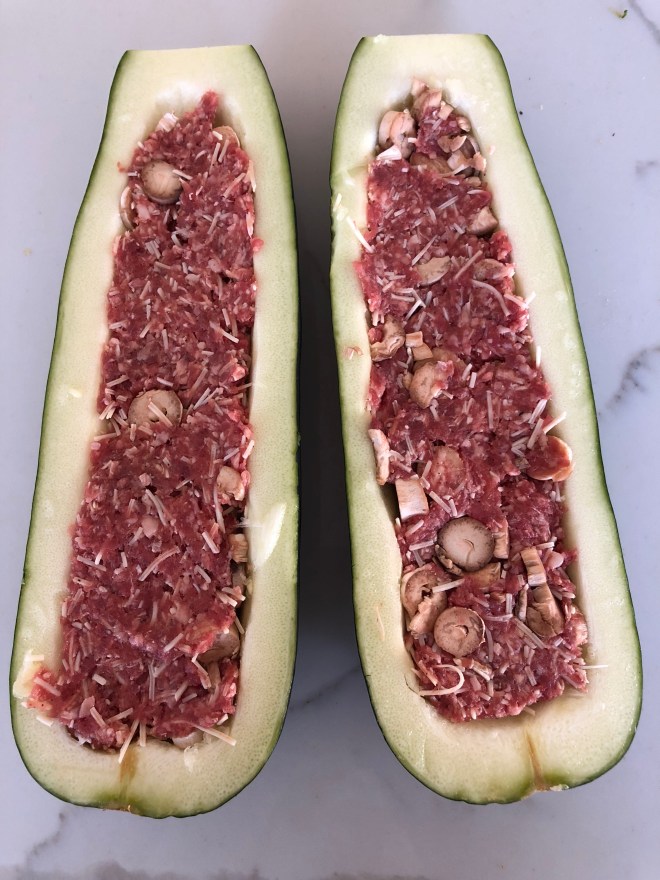
4. Bake until the meat is cooked thoroughly and a fork can easily be inserted into the zucchini. (You May like your zucchini firmer/softer than me so cooking time may vary). My food is usually ready in about 20 minutes. 5. When food is about done, sprinkle the remaining Parmesan cheese on top and let melt for about 5 minutes and then remove from oven.

(We decided to make stuffed mushrooms with the extra meat mix and used the stems of the mushrooms for the zucchini boats! I get a lot of enjoyment from not wasting food and finding ways to use it all up!)

This is definitely a basic recipe and I love that it is quick to prepare yet delicious. And it gets rid of those giant zucchinis taking up all your counter space. Many people like to put pasta sauce on top or use other meats or cheeses to give it a different flavor. You can even add cream cheese to make it even creamier. This is our favorite combo so far and I hope you enjoy it. Let me know what you think! Katie

Guilt Free Strawberry Jam

Oh hey there! Long time no see. After weeks of absence I finally decided to write something:) And the first thing I thought I’d share was a delicious recipe for strawberry jam that changed my world. No really, it kind of did.

So I’ve always liked jam but have never eaten it since focusing on health. For years I’ve gone to family parties and avoided the homemade strawberry jam because I knew how much forsugar was in there. Jam was just never an option. If I was going to splurge it would be on chocolate, not jam.

A cute friend in my neighborhood knew we were limiting sugar at our house and brought over some simple, delicious, jam that was an instant game changer. With only 3 clean simple ingredients jam was back on the menu for my occasional Gf waffles, protein pancakes or PB&J.

Ingredients:

  • 2 cups washed, cut strawberries (stems removed obvi)
  • 1/4 c raw local honey
  • 2T chia seeds

Directions

1. Blend strawberries together until your preferred consistency (some people like chunky)

2. Mix in honey and chia seeds

3. Pour into a sauce pan and bring to a light boil. Stir for 5 minutes. Remove from heat, let cool, and store in jars in fridge or freezer.

….look at this delicious stuff. So yummy, simple and clean, no refined sugar or preservatives, and extremely easy to make.

Enjoy!

Keto Quiche

I don’t know what your family eats for Easter dinner but ham was abundant at ours…and eggs of course. Both families had lots of ham and lots of left overs. I hate letting leftovers go bad so I wanted to put all that extra ham and eggs to use!

Ingredients:

  • 2 cups cubed ham
  • 1 c shredded Cheddar Cheese
  • 1 c Swiss Cheese
  • 1 c goat milk (or whole milk)
  • 1/2 c low fat cottage cheese
  •  4 small eggs (or 3 large eggs)
  • 1/2 t salt 1/2 t pepper (if your ham is already heavily salted, no need to add extra salt)

Directions

  1. Preheat oven to 350 degrees. Cube your ham and lay in the bottom of a pie baking dish. Sprinkle cheddar cheese + swiss cheese on top of the ham.
  2. In a blender (I use my Vitamix) combine milk, eggs, cottage cheese, and seasoning. Blend on med-high until smooth.
  3. Pour the egg/milk mixture over the ham and cheese. The filling should be about 1/2-3/4 inches from the top of the dish. As the Quiche cooks the pan will fill but not overflow. If you feel like your dish is too full you can place the baking dish on a cookie sheet to catch any spills.
  4. Bake at 350 degrees for about 30-45 minutes or until the quiche forms up. You may be tempted to keep cooking the quiche until it feels hard in the middle, but overcooking will cause the eggs to be rubbery, The goal is for the quiche to be light and fluffy. So as soon as the center is no longer liquid it can come out. it will firm up as it cools.

Typically I add mushrooms, spinach, and other veggies to my quiche but this is a good ole meat and eggs version that even my husband loved! (he doesn’t  usually care much for quiche). I hope you enjoy it and will share your feedback!

Katie